Tuesday, December 18, 2012

Dash 8-40CW's with Manifest Freight


The Santa Fe ordered 152 of these units from GE between 1992 and 1993. They were the predecessors to the Dash 9-44CW's, which had better adhesion trucks and 3-400 more horsepower, as well as better fuel consumption.

As far as the models go, these units pale in comparison to the Kato Dash 9-44CW's. The made in China stamping is the first indication that this would be a poor performing unit, which it is in every way. As with the BNSF, I shall be retiring these Super Fleet units first.
The first car in the consist is the Rio Grande gondola.  All my gondolas on my layout are heavily weathered, as you will see in the following.
CB&Q gondola.  Notice weathering on trucks and wheels.
Santa Fe 60' waffle box car.  MT car issued by Lowell Smith.
Santa Fe 60' DD Hi Cube boxcar.  MT car custom painted and decaled.  Bx-138 class boxcar, modeled after photo from the book Santa FeFreight in Color...The Series. 
The covered gondolas from Micro Trains are really cool models, but way to shinny out of the box.  Weathering on the coverings is a must.
Mildly weathered Chicago and Eastern Illinois gondola.
Couple of examples on a Detroit, Toledo and Ironton gon and a Western Pacific covered gondola.


Back in the late eighties, I spotted a Santa Fe manifest freight heading through Cajon Pass with four of these cars in a row. A few years ago a company in Oregon called LBF made these cars available, whereas I quickly purchased four of them.  I have not heard much lately from this company, but I got these, as well as a UP model.

I think this looks pretty cool!  All slightly weathered.
Covered hopper with replacement hatch and evidence of repair on left.

Custom painted and decaled 50' GN boxcar.  You can see a prototype photo of this car on page 69 of the book "Great Northern Equipment Color Pictorial" by Scott R. Thompson.

UP center depressed flat car with load.  Strapped down, and industrial decals added to whatever this thing is.

Heavily weathered UP 60' single door boxcar.

Atlas tank car from the 70's (?) upgraded with Gold Medal Models brass end plates, walkways and railings.  Really improves the appearance of this model and brings it up to 21st century specifications.  Note the weathered trucks and especially treatment of the MT wheels.

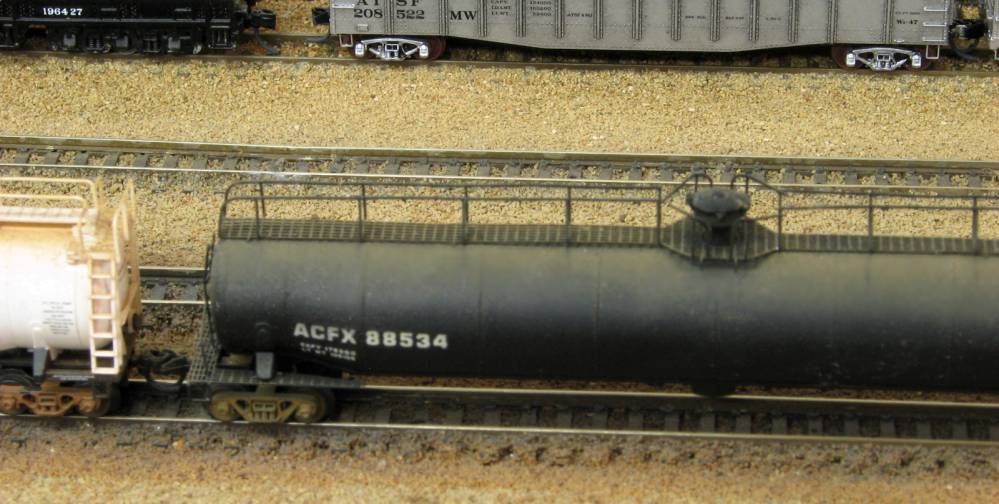
Detail of the rust weathering flowing down from the top of car.

Pyrofax Gas tank car, released originally by Atlas in very late 90's.  The plastic railings are much improved over previous releases.  This tank is still available today.
MR 60' waffle car, slightly weathered.  I have another of these cars weathered much heavier.  Yellow cars look great with a little rust applied.  The photo robs the cars of the subtle weathering applied here.

ATSF 60' single door boxcar.  This is an Atlas model custom painted and decaled.  This Bx-101 car is turning pink with age.  Notice the uncommon black Santa Fe lettering in the 10' Cirlce Cross.  Note the contast in color with the repainted wide cupola caboose, a very nice Atlas model. (I added the caboose to this photo just for contrast.)
 
Thanks for viewing this blog.
 
You can see a video of this train on YouTube at the following link:


                                             http://youtu.be/uFFM92d4b80


Monday, December 3, 2012

Amtrak Southwestern Chief


This photo represents the Southwestern Chief in or around 1974.  The lead unit is an Amtrak acquisition, a SDP40F, in it's as delivered paint scheme.  The second unit is an E8. I found a few photos of the SDP40F mu'd with an E8 on the RRPICTUREARCHIVES.NET website.  There are many thousands of railroad photos for you to use as a reference.  I would encourage you to visit this site.


The SDP40F was made for Amtrak by EMD, Electro Motive Division of General Motors in 1973.  It was essentially and SD40-2 in a "cowl" body.  It had a 16 cylinder 3000 hp prime mover.  The model is again an old Life Like FP45, heavily modified.  The FP45 is similar in appearance to the SDP40F, a model which is not likely to be produced in N Scale.


The above model  is an E8 from Kato.  It is custom painted, as I put these units together in the nineties.  (An E8 in Amtrak paint scheme is sometimes available from Kato.)  Notice the difference in the paint schemes on these two units, the location of the "arrow" and the difference in the placing of the name Amtrak, and the different type and coloring of the lettering.  Amtrak received dozens of E8 and E9 locomotives from the various railroads joining Amtrak.


Stock Con Cor Amtrak baggage car.
 
These Kato Superliner cars represent the original Amtrak paint scheme.  These passenger cars have seen four paint schemes over the years. 
 
From right to left, a dining car, lounge, and a baggage coach crossing the Mojave desert eastbound.
 

Southwestern Chief passing through my recently installed Tomar searchlights.

 
This is the power source for the SDP40F.  It is the chassis from a Kato C44-9W, with trucks taken from a SD45.  These trucks are available separately from the Kato parts department on their website.  There is some cutting of the frame involved.  This is a modification unnecessary now(even if you could find an old Life Like model)  with the availability of the FP45's from Athearn.  
 
 
For a short video of the Southwestern Chief, go to: 


                                                                http://youtu.be/3viSYOJz5xA

Sunday, November 18, 2012

Logic Rail Technologies BA-1-IR and Tomar Searchlight Signals


Wiring the Tomar searchlight.


This week I would like to show you the Logic Rail Technologies Infrared Block Animator. On my layout, the infrared detector is the best block animator as it eliminates the problem with direct and/or indirect lighting.  I am using this detector with the new Tomar searchlights. I have installed 11 different blocks successfully and they work perfectly. The only problem I had initially was how to hook up the lights, a problem solved with help from Chuck Stancil at Logic Rail.


The above information is directly from the instruction sheets and highlight the aspects of the BA-1-IR detector. The highlights are the bi-directional control of two blocks and the ability to work with various manufacturers and types of signals, yellow delay, and no modifications to track, rolling stock, or motive power.


I used the Tomar N-872 signal searchlight and the N-873 dual searchlight with the BA-1-IR. Chuck informed me that the Tomar searchlight is a "classic searchlight signal which uses a single bipolar LED within the signal head..." He also stated that the "BA-1-IR will create yellow by blending the red and green LED's.  It does this electronically within the board itself".  Magic!


I was initially confused as to how to hook up the Tomar searchlight to the BA. However, Chuck Stancil at Rail Logic was happy to help with the wiring. He told me to refer to Figure 1b in the instructions, as I was unable to figure which illustration would work with the Tomar signal.  Thank you very much, Chuck!


There are two ways to make the connection, with this illustrating using just one resistor (supplied with the BA). Although the label says black wire, it could also be a blue wire.  Whichever, it is the common.


This is the method I used, using a resistor on each of the leads, again with the same resistors supplied with the BA-1-IR.  Make sure your wiring is done with care.  If an LED's green or red is not functioning correctly, recheck your wiring.  It happened to me, where a green diode was barely lit.  I rewired, and it came to a full bright light.

In my next blog, I will cover wiring of the infrared emitters and detectors.

You can see a demonstration of the finished product on YouTube at:

                       http://youtu.be/3eogErne3wo


Tuesday, November 6, 2012

Mustangs by the Bay, San Diego CA October 2012


Just thought I'd divert from the model trains to share with you a few photos from the San Diego Mustang Club's annual Mustang show.  It takes place in Embarkadero Park which is located in downtown San Diego on the waterfront, a very scenic place for a car show.  Every year, participation in this show increases, and there had to be 300 cars there this year.  Because of the popularity of the recent model year Ponies, the grounds are nearly completely full. 

Here in this blog, I will show you a couple of photos of my 1967 Mustang convertible.  It has a 302 ci engine I obtained from Ford Racing a couple years back.  It has a roller cam, high compression heads, a Holley 471 carburetor, dual exhausts, and a C4 three speed automatic transmission.  It is a daily driver. 
 
      A video of the show can be seen on YouTube at:
          
                                   http://youtu.be/9MXupwhGDek


Tuesday, October 23, 2012

New Video posting on YouTube

I am busy installing Logic Technologies infrared block detectors combined with new Tomar Searchlight signals on my layout.  I will put together a review at a later time.  It is going very well for now, having successfully installed six of eleven blocks.

In the meantime, I have posted a new video on YouTube at:

                                             http://youtu.be/xHoK4OgOY6w

Tuesday, October 9, 2012

Weathering Red Caboose Auto Racks

A few months ago, I posted a "how to" on weathering Micro Trains Auto Racks, and promised a follow up on weathering Red Caboose  Auto Racks.  There is a big difference in construction and assembly of the two models, and the following should help you to "age" those auto racks properly. The Red Caboose Auto Rack does not want to be disassembled!  Please refer to that blog (July 9, 2012) for review of materials needed and weathering tips.
Spray the entire car with dull coat and let dry thoroughly.  Next, mask off the support pillars for weathering.  It is easy to do two cars at the same time.  Carefully align the two cars together per the above photo.  Use Tamiya 10 mm wide masking tape and mask off the outside pillars.  Then work your way into the middle.  Weather all the pillers with chalks and seal with dull coat before removing masking tape.


The next step in the process is to mask off the roof and the frame portion of the auto rack.  Weather the frame with oils and chalks, dull coat the frame portion, and set aside to dry. Use needle nose tweezers to remove the masking tape at the appropriate time.


At this point, your auto rack should look something like this.

The Red Caboose Auto Rack has terrific roof detail.  The cars shows the rivet detail much more so than the Micro Trains model.  This is no slight to the M/T model, as these are models of two different types of auto racks (two level for pickup trucks and triple level for automobiles). 


Now is the time to weather the roof.  This should be done with attention to the riveting on the roof.  I like to dab a little mixture of rust and dark sienna oils with a toothpick to the center of the rivet line and sweep back and forth along that line with a clean, dry paint brush, one used only for weathering.  A very tiny dab should be used on the downside of the roof if necessary. Let dry completely.  The above shows results so far.


Close up of completed weatering of roof.  Don't forget to seal with dull coat and set aside.


Next we want to mask off the panels.  Many of these auto racks in the late 70's and early 80's were heavily weathered per the above photo.  Mask off as suggested by the photo, again using Tamiya tape.

Weather each panel individually, trying to vary weathering in each panel.  Why some panels are heavily weathered and others not is a mystery to me, but makes for a very cool looking model on my Needles Division, and will on yours, too.  After the panels dry, remove masking and slightly weather remaining panels.  Seal with dull coat, and install trucks.
When finished, your model should look something like this.

PHOTO GALLERY


This is not an easy project, but a very satisfying one.  The difference between an "out of the box" auto rack and the finished product as illustrated in this blog is enormous!  Good luck on your project.
 
I have a previously posted an N Scale video of a 1981 Auto Rack train on YouTube (the Red Caboose auto racks are primarily in the middle of the train) at:

                                              http://youtu.be/XxzUouLStgo